Setting Up Data Exports
This customisable Export feature enables you to schedule data exports using various transport types (Email, FTP, Dropbox, HTTP, AWS S3, Azure Blob Storage) and in various formats (CSV, JSON and XML).
Note: These features can only be accessed by Client Admin users. Your Wildeye devices may be managed by a third party as a service.
Export Settings
In the Export page, click Add New Export button.
A new Export form opens.
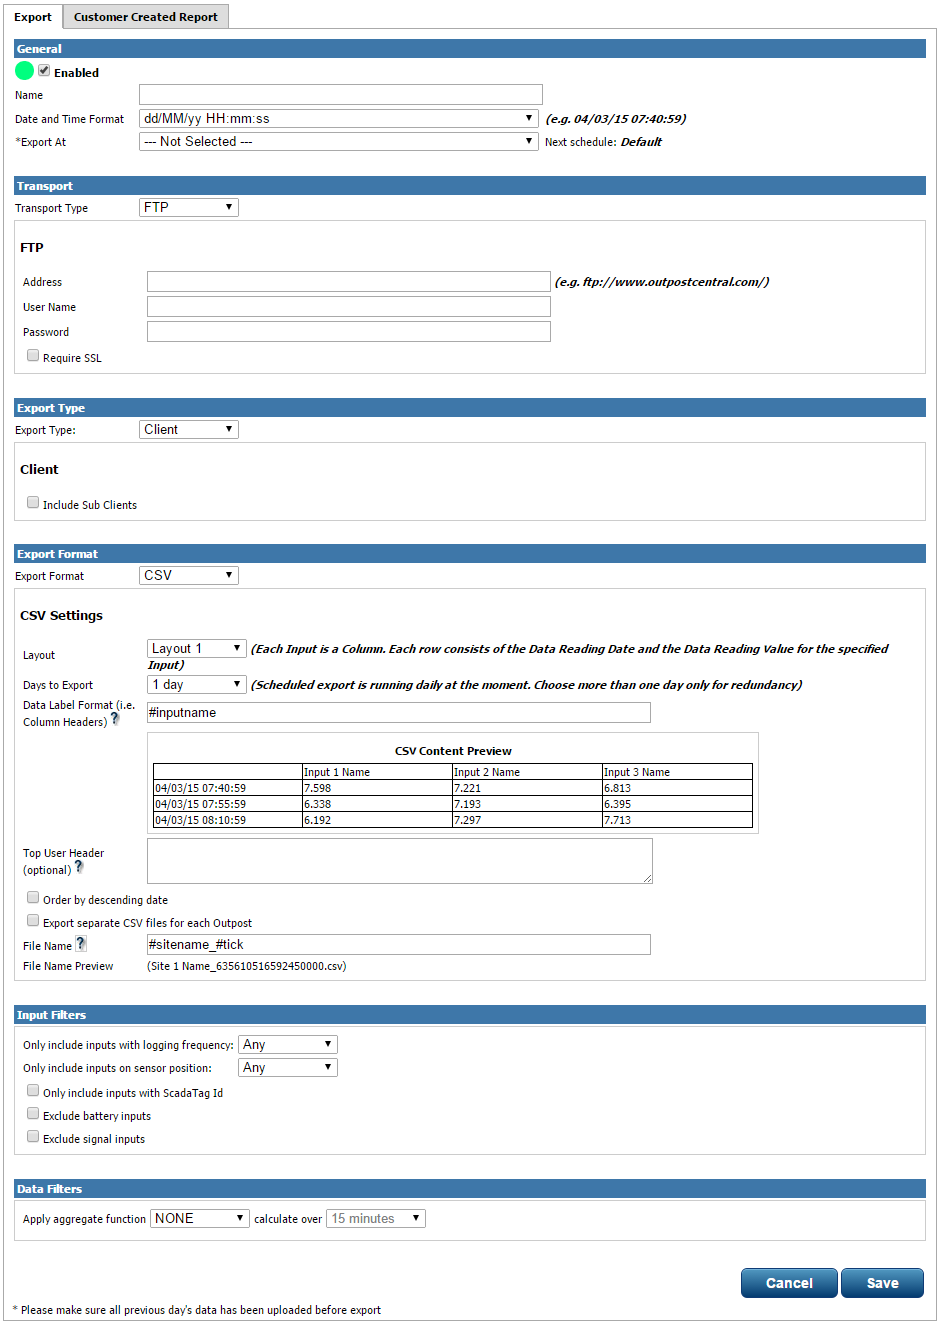
Enter details.
Enabled - uncheck to disable the export; default checked.
Name - enter name for the export (mandatory)
Date and Time Format - select date and time format from drop-down list; default ISO8601 (Recommended)
Export at - select time for the export.
Transport Type - select type of transport required from drop-down list; default FTP. Next input field will be depend on selection.
FTP - enter FTP details including address, username, password. Check Require SSL if FTP connection requires SSL.
Email - enter a valid email address.
HTTP - enter a valid URL, and select an appropriate method (PUT/POST). For AWS S3 you will need to configure the Authentication with AWS Signature information. If you need additional custom headers sent to the server you can add these in.
Export Type - select type of export from drop-down list; default Client. Next input field will depend on selection.
Client - export all sites from the client as defined in Creating Clients. Ensure Include Sub Clients is ticked if you wish to export all sub-client sites.
Group - export all sites from the group as defined in Groups. Select the group from the drop-down list.
Site - export specific site by selecting from the drop-down list.
Export Format - CSV, JSON and XML available. See below for more details.
Layout - select file layout from drop-down list. The following fields will depend on selection. Click on the help
 to get further details of the field. The content preview shows what the export will look like.
Click Save
Azure Blob Storage
To configure an export for Azure Blob Storage, select the HTTP transport option. In the URL field include a blob container URL with SAS token included. The URL must include blob.core.windows.net for our system to treat it as an Azure Blob Storage destination.
CSV Layouts
The main CSV layouts are explained below. The column headers and file headers can be customized.
Layout 1
(Each Input is a Column. Each row consists of the Data Reading DateTime and the Data Reading Value for the specified Input)
A sample of layout 1 is:

Layout 2
(A Vertical List of Input Data Readings. Each row consist of an Input Name, Data Reading Date and the Data Reading Value)
A sample of layout 2 is:

Customizing file and column headers
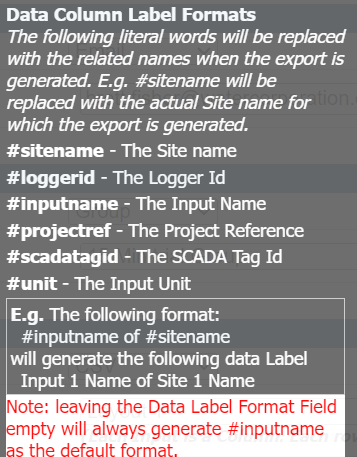
The data label format field describes the column header name. The following hashtags can be used:
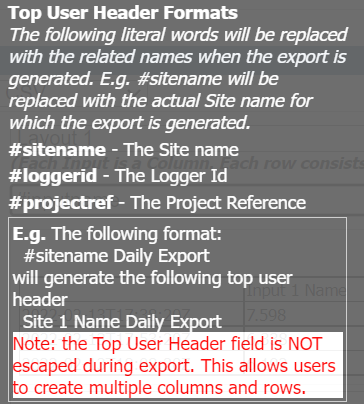
The file header is optional and customized in the "Top User Header" field. The following hashtags can be used:
JSON Settings
For a JSON export the following is a sample export:
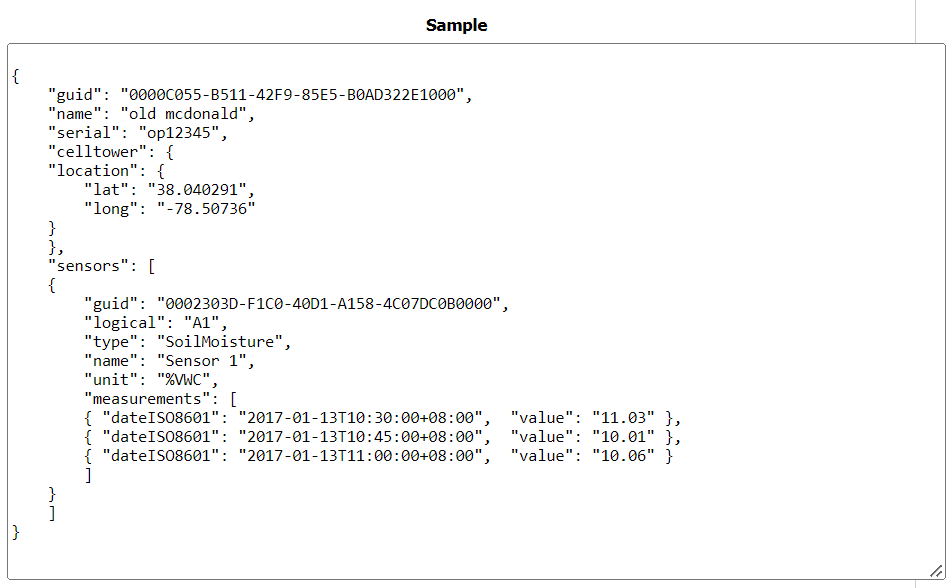
JSON can also be retrieved from an API where permission has been obtained through Wildeye.
File Name Settings
The name of the file can be customized in this section.
Export separate files for each site: When this option is selected, a separate file will be created for each Site in the export. Otherwise all Sites will be combined in a single file. The #sitename and #ProjectRef hashtags used in the Top User Header and File Name fields are only available when this option is selected.
FileName A user definable name for the file. The following hashtags can be used:
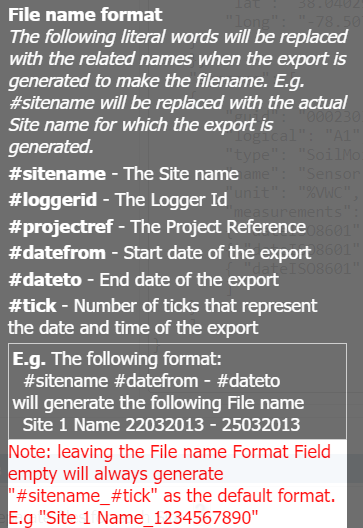
FileName Sample A dynamically generated sample file name to give the user feedback as to how the file name will appear with the above settings.
Compress to Zip File If selected, the exported file will be compressed as a Zip file.
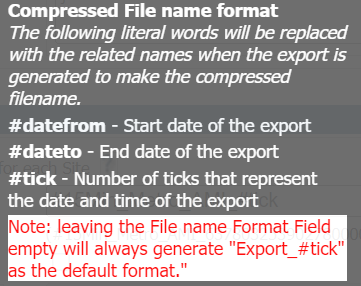
Compressed File Name When Compress to Zip File is selected then this field allows the customization of the compressed file name. The following hash tags can be used:
Input Filters
To reduce the number of Inputs appearing in exported files these settings can be used.
Only include inputs with logging frequency Limit the export to only include Inputs that are logging at a specified logging frequency.
Only include inputs on sensor position Limit the export to only include Inputs on a particular sensor position (cable as defined in the product code)
Only Include inputs with ScadaTag ID Any Input can have a SCADA TagID assigned in the Input Settings page. Only Inputs with ScadaTagID will be included in the export if this option is selected. The ScadaTag ID can also be used to customize the Column Header in file layouts.
Exclude Battery Inputs Don't include device battery Inputs.
Exclude Signal Inputs Don't include device signal inputs
Data Filters
Where data must be restricted to predetermined intervals, this option will force data to a selected interval if the data has been logged at different intervals or there is extra data from button presses or magnet swipes. Data can be aggregated to the intervale using MAX, MIN, AVG or SUM.
